> ## Documentation Index
> Fetch the complete documentation index at: https://docs.alphapo.net/llms.txt
> Use this file to discover all available pages before exploring further.
# Payment requests integration guide
Let your customers pay crypto via a convenient interface with rate lock, currency conversion, and easy refunds.
 ## Set up payment requests
Complete your onboarding in your merchant dashboard and generate an API key. For more details on how to create an API key, see [Get your API key](/merchant-administration/generate-and-activate-api-keys).
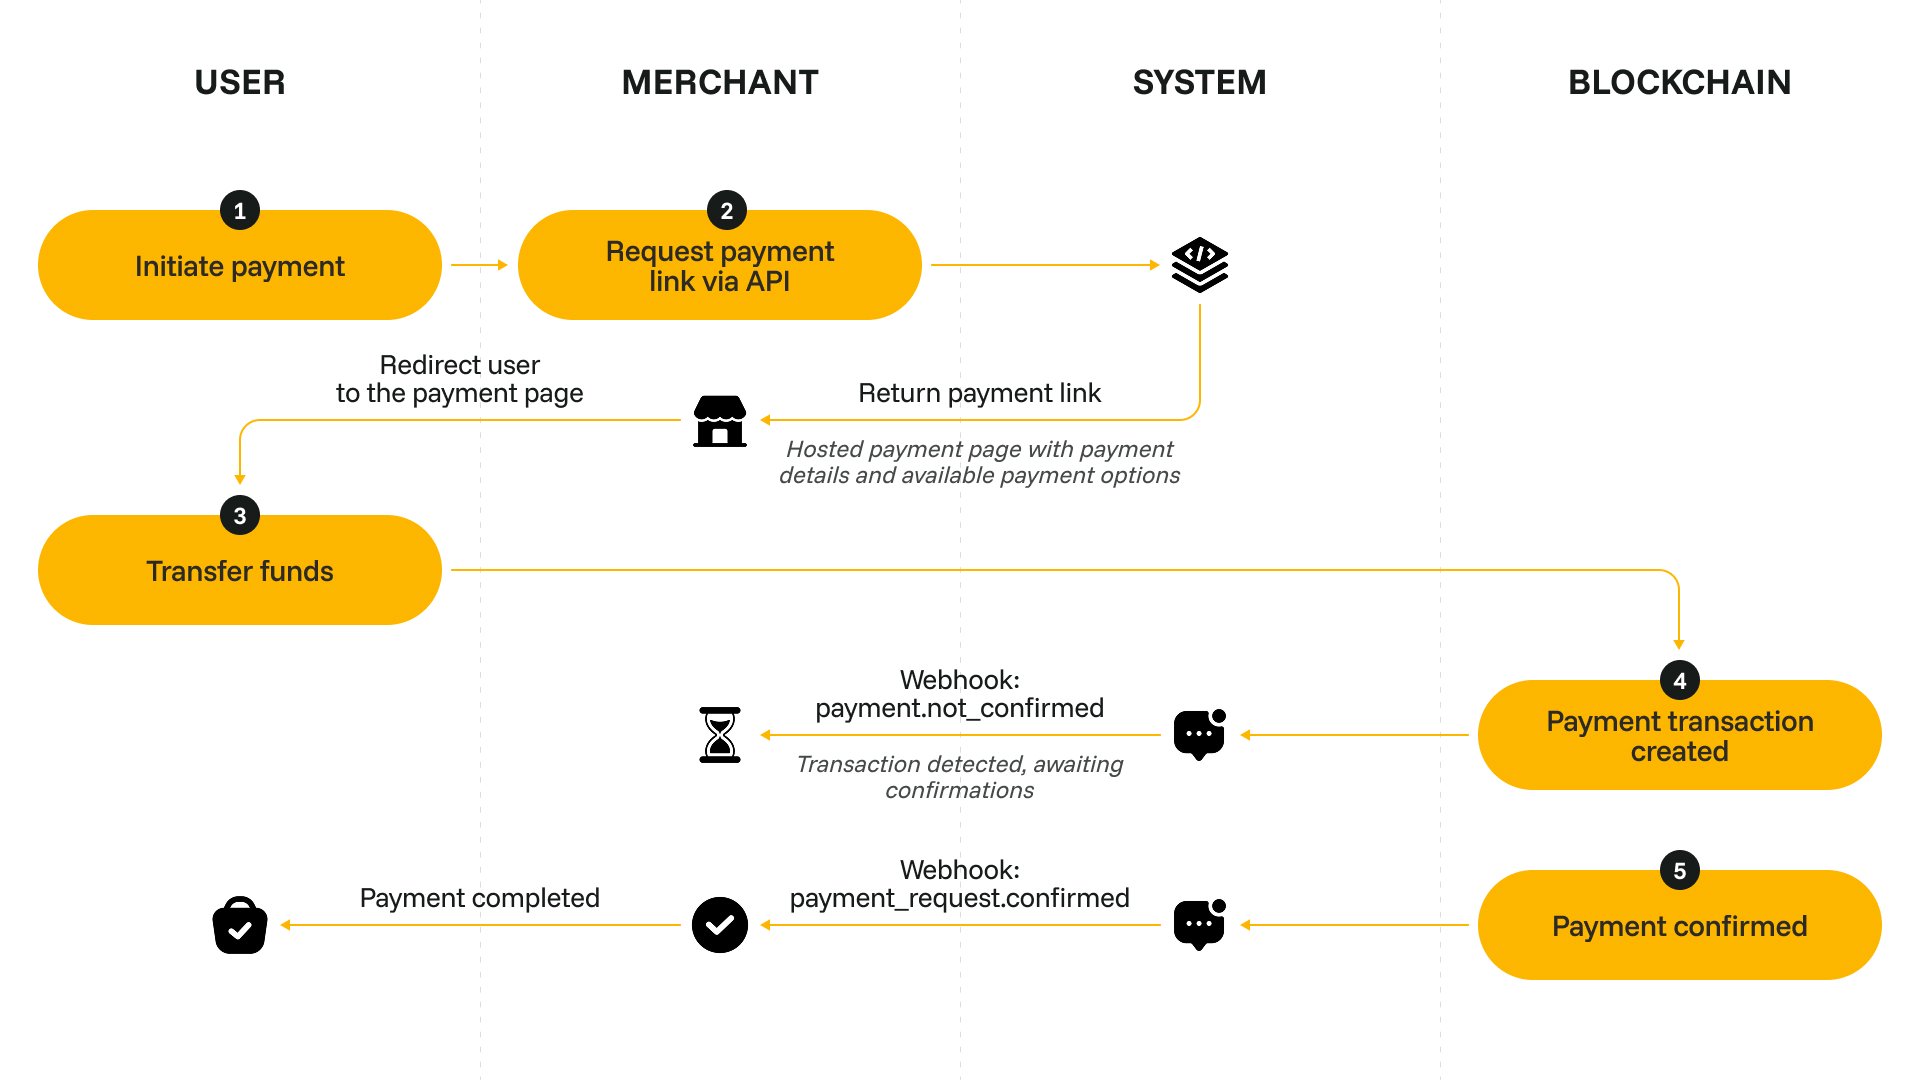
When the customer wants to make a new purchase, send a request to [/payments/v1/requests](/api-reference/endpoints/payments). Specify the required amount, [currency](/payment-requests#currency-selection) and [lifespan](/payment-requests#lifespan-and-rate-lock) for the payment request.
```json title="Request example" theme={null}
{
"amount": "100",
"currency": {
"iso": "EUR"
},
"life_time_duration": 360000,
"end_user_email": "customer@example.com",
"description": "Order 0512",
"url_store": "https://example.com/store"
}
```
```json title="Response example" theme={null}
{
"data": {
"id": "019d511c-9fd2-7e71-b534-74e8abd855f1",
"amount": "100",
"currency": {
"iso": "EUR"
},
"status": "created",
"life_time": 1775542323,
"end_user_email": "customer@example.com",
"description": "Order 0512",
"payment_link": "https://payments.alphapo.net/payment/lLXLZ6Q8lCwFFRbyW0C1ET",
"url_store": "https://example.com/store"
}
}
```
The URL of the interface is provided in the `data.payment_link` field of the API response. Depending on your payment flow, you can:
* navigate the customer to the payment request link in a new tab,
* generate a QR code based on the payment request link and display it to your customer,
* embed the payment link as an iFrame for quick on-page checkout.
For the customer's convenience, we recommend providing a link to the pending payment request somewhere on your site, too. This way, if the customer accidentally closes the payment request tab before finishing the payment, they will use the link to continue the process.
When you get the [payment\_request](/api-reference/callbacks/payment-request-callbacks) callback, update the purchase status on your site.
Make sure to cover all possible statuses of the callback. For a failed payment request, consider showing a 'Retry' button that initiates a purchase of the same product again.
## Set up payment requests
Complete your onboarding in your merchant dashboard and generate an API key. For more details on how to create an API key, see [Get your API key](/merchant-administration/generate-and-activate-api-keys).
When the customer wants to make a new purchase, send a request to [/payments/v1/requests](/api-reference/endpoints/payments). Specify the required amount, [currency](/payment-requests#currency-selection) and [lifespan](/payment-requests#lifespan-and-rate-lock) for the payment request.
```json title="Request example" theme={null}
{
"amount": "100",
"currency": {
"iso": "EUR"
},
"life_time_duration": 360000,
"end_user_email": "customer@example.com",
"description": "Order 0512",
"url_store": "https://example.com/store"
}
```
```json title="Response example" theme={null}
{
"data": {
"id": "019d511c-9fd2-7e71-b534-74e8abd855f1",
"amount": "100",
"currency": {
"iso": "EUR"
},
"status": "created",
"life_time": 1775542323,
"end_user_email": "customer@example.com",
"description": "Order 0512",
"payment_link": "https://payments.alphapo.net/payment/lLXLZ6Q8lCwFFRbyW0C1ET",
"url_store": "https://example.com/store"
}
}
```
The URL of the interface is provided in the `data.payment_link` field of the API response. Depending on your payment flow, you can:
* navigate the customer to the payment request link in a new tab,
* generate a QR code based on the payment request link and display it to your customer,
* embed the payment link as an iFrame for quick on-page checkout.
For the customer's convenience, we recommend providing a link to the pending payment request somewhere on your site, too. This way, if the customer accidentally closes the payment request tab before finishing the payment, they will use the link to continue the process.
When you get the [payment\_request](/api-reference/callbacks/payment-request-callbacks) callback, update the purchase status on your site.
Make sure to cover all possible statuses of the callback. For a failed payment request, consider showing a 'Retry' button that initiates a purchase of the same product again.